文章目录
- Appium服务器是基于Node.js开发的,因此首先需要安装Node.js。可以从Node.js官网下载并安装最新版本。 安装完成后,可以通过以下命令验证安装是否成功: node –version npm –version
- 通过NPM全局安装Appium: npm install -g appium 安装完成后,可以通过以下命令启动Appium服务器: appium
- 使用pip安装Appium的Python客户端库: pip install Appium-Python-Client
- 对于Android设备,需要安装Android SDK并配置环境变量: 下载Android Studio或独立SDK工具 设置ANDROID_HOME环境变量 将platform-tools和tools目录添加到PATH环境变量中
- Appium需要Java环境支持,请安装JDK 8或更高版本。
- Appium采用客户端-服务器架构: Appium服务器:接收来自客户端的命令,并将其转换为移动设备可以理解的原生命令 Appium客户端:各种编程语言的客户端库,用于发送命令到Appium服务器
- Desired Capabilities是一组键值对,用于告诉Appium服务器我们想要启动怎样的会话。常见的Capabilities包括: platformName:平台名称(Android或iOS) platformVersion:平台版本 deviceName:设备名称 appPackage:应用包名 appActivity:应用活动名
- Appium支持多种元素定位策略: ID定位 Class Name定位 XPath定位 Accessibility ID定位 Android UI Automator定位
- from appium import webdriver from appium.webdriver.common.appiumby import AppiumBy from appium.options.android import UiAutomator2Options import time import unittest
- def setup_driver(): # 配置Appium选项 options = UiAutomator2Options() # 设置设备基本信息 options.platform_name = ‘Android’ options.platform_version = ’12’ # 根据你的设备版本修改 options.device_name = ‘Android Emulator’ options.automation_name = ‘UiAutomator2’ # 设置应用信息 options.app_package = ‘com.android.calculator2’ options.app_activity = ‘com.android.calculator2.Calculator’ # 其他设置 options.no_reset = True # 不重置应用状态 # 连接Appium服务器 driver = webdriver.Remote(‘http://localhost:4723’, options=options) return driver
- def calculator_operations(driver): “””执行计算器操作””” try: # 等待计算器加载完成 time.sleep(2) # 定位数字按钮和操作符 # 注意:不同设备上的计算器应用可能具有不同的元素ID # 这里使用的是Android原生计算器的元素ID # 点击数字 7 btn_7 = driver.find_element(AppiumBy.ID, ‘com.android.calculator2:id/digit_7’) btn_7.click() # 点击加号 btn_plus = driver.find_element(AppiumBy.ID, ‘com.android.calculator2:id/op_add’) btn_plus.click() # 点击数字 8 btn_8 = driver.find_element(AppiumBy.ID, ‘com.android.calculator2:id/digit_8’) btn_8.click() # 点击等号 btn_equals = driver.find_element(AppiumBy.ID, ‘com.android.calculator2:id/eq’) btn_equals.click() # 获取结果 result = driver.find_element(AppiumBy.ID, ‘com.android.calculator2:id/result’) calculated_result = result.text print(f”计算结果: 7 + 8 = {calculated_result}”) # 验证结果是否正确 expected_result = ’15’ if calculated_result == expected_result: print(“测试通过!计算结果正确。”) else: print(f”测试失败!期望结果: {expected_result}, 实际结果: {calculated_result}”) return calculated_result except Exception as e: print(f”操作过程中出现错误: {str(e)}”) return None
- class CalculatorTest(unittest.TestCase): “””计算器测试类””” def setUp(self): “””测试前置设置””” self.driver = setup_driver() self.driver.implicitly_wait(10) # 设置隐式等待时间 def tearDown(self): “””测试后置清理””” if self.driver: self.driver.quit() def test_addition_operation(self): “””测试加法运算””” result = calculator_operations(self.driver) self.assertEqual(result, ’15’, “加法运算结果不正确”) def test_clear_operation(self): “””测试清除操作””” try: # 先输入一些数字 btn_5 = self.driver.find_element(AppiumBy.ID, ‘com.android.calculator2:id/digit_5’) btn_5.click() # 点击清除按钮 btn_clear = self.driver.find_element(AppiumBy.ID, ‘com.android.calculator2:id/clr’) btn_clear.click() # 验证显示区域是否已清除 result = self.driver.find_element(AppiumBy.ID, ‘com.android.calculator2:id/formula’) current_display = result.text # 清除后显示区域应该为空或显示0 self.assertTrue(not current_display or current_display == ‘0’, “清除操作未正常工作”) except Exception as e: self.fail(f”清除操作测试失败: {str(e)}”)
- 在实际应用中,我们可能会遇到各种复杂的定位情况。以下是一些常用的定位方法: def advanced_element_locating(driver): “””演示高级元素定位方法””” # 1. 使用XPath定位 # 通过文本内容定位元素 element_by_text = driver.find_element(AppiumBy.XPATH, “//*[@text=’确定’]”) # 通过部分文本内容定位 element_by_partial_text = driver.find_element( AppiumBy.XPATH, “//*[contains(@text, ‘确定’)]” ) # 2. 使用Accessibility ID定位(通常对应content-desc属性) element_by_accessibility = driver.find_element( AppiumBy.ACCESSIBILITY_ID, “按钮描述” ) # 3. 使用Class Name定位 elements_by_class = driver.find_elements( AppiumBy.CLASS_NAME, “android.widget.Button” ) # 4. 使用Android UI Automator定位 element_by_uiautomator = driver.find_element( AppiumBy.ANDROID_UIAUTOMATOR, ‘new UiSelector().text(“确定”)’ ) return { ‘by_text’: element_by_text, ‘by_partial_text’: element_by_partial_text, ‘by_accessibility’: element_by_accessibility, ‘by_class’: elements_by_class, ‘by_uiautomator’: element_by_uiautomator }
- Appium支持多种手势操作,如滑动、长按、拖拽等: def gesture_operations(driver): “””演示手势操作””” # 获取屏幕尺寸 window_size = driver.get_window_size() screen_width = window_size[‘width’] screen_height = window_size[‘height’] # 1. 滑动操作 – 从底部滑动到顶部 start_x = screen_width / 2 start_y = screen_height * 0.8 end_x = screen_width / 2 end_y = screen_height * 0.2 driver.swipe(start_x, start_y, end_x, end_y, 1000) # 2. 滚动操作 # 滚动到指定元素 scroll_to_element = driver.find_element( AppiumBy.ANDROID_UIAUTOMATOR, ‘new UiScrollable(new UiSelector().scrollable(true))’ ‘.scrollIntoView(new UiSelector().text(“目标元素”))’ ) # 3. 长按操作 element_to_long_press = driver.find_element(AppiumBy.ID, ‘some.element.id’) driver.long_press(element_to_long_press) # 4. 拖拽操作 source_element = driver.find_element(AppiumBy.ID, ‘source.element’) target_element = driver.find_element(AppiumBy.ID, ‘target.element’) driver.drag_and_drop(source_element, target_element)
- def handle_popups_and_permissions(driver): “””处理弹窗和权限请求””” try: # 尝试查找并点击允许按钮 allow_button = driver.find_element( AppiumBy.ID, ‘com.android.packageinstaller:id/permission_allow_button’ ) allow_button.click() print(“已处理权限请求”) except Exception: # 如果找不到特定的允许按钮,尝试其他方式 try: # 使用文本定位允许按钮 allow_by_text = driver.find_element( AppiumBy.XPATH, “//*[@text=’允许’ or @text=’ALLOW’]” ) allow_by_text.click() print(“通过文本定位处理了权限请求”) except Exception: print(“未找到权限请求弹窗或处理失败”) # 处理其他类型的弹窗 try: # 查找确定、好的、知道了等按钮 confirm_buttons = [ “确定”, “确认”, “好的”, “知道了”, “OK”, “Okay” ] for button_text in confirm_buttons: try: confirm_btn = driver.find_element( AppiumBy.XPATH, f”//*[@text='{button_text}’]” ) confirm_btn.click() print(f”点击了 {button_text} 按钮”) break except Exception: continue except Exception as e: print(f”处理弹窗时出现错误: {str(e)}”)
- 合理的等待策略对于自动化测试的稳定性至关重要: from selenium.webdriver.support.ui import WebDriverWait from selenium.webdriver.support import expected_conditions as EC def wait_strategies(driver): “””演示不同的等待策略””” # 1. 显式等待 – 等待元素可点击 wait = WebDriverWait(driver, 10) element = wait.until( EC.element_to_be_clickable((AppiumBy.ID, ‘some.element.id’)) ) element.click() # 2. 显式等待 – 等待元素可见 visible_element = wait.until( EC.visibility_of_element_located((AppiumBy.ID, ‘visible.element’)) ) # 3. 显式等待 – 等待元素存在(不一定可见) present_element = wait.until( EC.presence_of_element_located((AppiumBy.ID, ‘present.element’)) ) # 4. 自定义等待条件 def custom_condition(driver): “””自定义等待条件””” try: element = driver.find_element(AppiumBy.ID, ‘custom.element’) return element.is_displayed() except Exception: return False custom_element = wait.until(custom_condition) return { ‘clickable’: element, ‘visible’: visible_element, ‘present’: present_element, ‘custom’: custom_element }
- 问题:无法连接到Appium服务器 解决方案: 确保Appium服务器正在运行:appium 检查端口是否被占用,默认端口是4723 验证URL格式:http://localhost:4723
- 问题:脚本无法找到指定元素 解决方案: 增加等待时间,使用显式等待 使用不同的定位策略 检查应用是否已正确启动 使用Appium Desktop的Inspector工具验证元素定位
- 问题:应用权限请求导致脚本中断 解决方案: 在Desired Capabilities中设置autoGrantPermissions: true 在脚本中添加权限处理逻辑 手动预先授予应用所需权限
- 问题:脚本运行缓慢 解决方案: 减少不必要的等待时间 使用更高效的元素定位策略 避免频繁的页面源代码获取 考虑使用更快的测试设备或模拟器
目录
- 1. 引言
- 2. 环境准备
- 2.1 安装Node.js和NPM
- 2.2 安装Appium
- 2.3 安装Appium Python客户端
- 2.4 安装和配置Android SDK
- 2.5 安装Java Development Kit (JDK)
- 3. Appium基础概念
- 3.1 Appium架构
- 3.2 Desired Capabilities
- 3.3 元素定位策略
- 4. 编写第一个Appium脚本
- 4.1 导入必要的库
- 4.2 配置Desired Capabilities
- 4.3 实现计算器操作
- 4.4 完整的测试类
- 5. 进阶操作
- 5.1 处理不同的元素定位情况
- 5.2 手势操作
- 5.3 处理弹窗和权限请求
- 5.4 等待策略
- 6. 完整代码示例
- 7. 常见问题与解决方案
- 7.1 连接问题
- 7.2 元素找不到问题
- 7.3 权限问题
- 7.4 性能问题
- 8. 最佳实践
- 8.1 代码组织
- 8.2 错误处理
- 8.3 维护性
- 9. 总结
在当今移动互联网时代,手机应用已经成为人们日常生活中不可或缺的一部分。随着移动应用的快速发展,自动化测试和手机操作的需求也日益增长。Appium作为一个开源的移动应用自动化测试框架,能够帮助我们实现这一目标。
Appium支持多种编程语言,包括Python、Java、Ruby等,并可以同时测试Android和iOS平台的应用。它采用WebDriver协议,使得我们可以使用熟悉的Selenium WebDriver API来编写移动应用的自动化脚本。
本文将详细介绍如何使用Python和Appium来操作手机,从环境搭建到实际脚本编写,帮助读者快速掌握这一实用技能。
在开始使用Appium之前,我们需要完成一系列的环境配置工作。以下是详细的步骤:
Appium服务器是基于Node.js开发的,因此首先需要安装Node.js。可以从Node.js官网下载并安装最新版本。
安装完成后,可以通过以下命令验证安装是否成功:
node --version
npm --version
通过NPM全局安装Appium:
npm install -g appium
安装完成后,可以通过以下命令启动Appium服务器:
appium
使用pip安装Appium的Python客户端库:
pip install Appium-Python-Client
对于Android设备,需要安装Android SDK并配置环境变量:
- 下载Android Studio或独立SDK工具
- 设置ANDROID_HOME环境变量
- 将platform-tools和tools目录添加到PATH环境变量中
Appium需要Java环境支持,请安装JDK 8或更高版本。
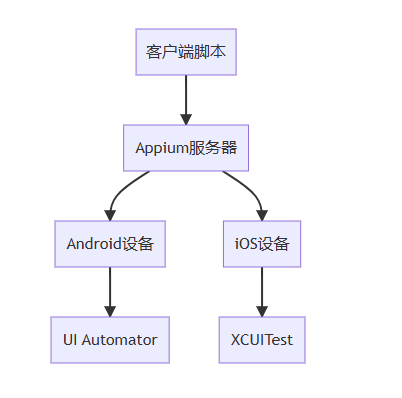
Appium采用客户端-服务器架构:
Appium服务器:接收来自客户端的命令,并将其转换为移动设备可以理解的原生命令
Appium客户端:各种编程语言的客户端库,用于发送命令到Appium服务器
Desired Capabilities是一组键值对,用于告诉Appium服务器我们想要启动怎样的会话。常见的Capabilities包括:
- platformName:平台名称(Android或iOS)
- platformVersion:平台版本
- deviceName:设备名称
- appPackage:应用包名
- appActivity:应用活动名
Appium支持多种元素定位策略:
- ID定位
- Class Name定位
- XPath定位
- Accessibility ID定位
- Android UI Automator定位
下面我们将编写一个简单的Appium脚本,用于打开手机上的计算器应用并进行简单的计算操作。
from appium import webdriver
from appium.webdriver.common.appiumby import AppiumBy
from appium.options.android import UiAutomator2Options
import time
import unittest
def setup_driver():
    # 配置Appium选项
    options = UiAutomator2Options()

    # 设置设备基本信息
    options.platform_name = 'Android'
    options.platform_version = '12'  # 根据你的设备版本修改
    options.device_name = 'Android Emulator'
    options.automation_name = 'UiAutomator2'

    # 设置应用信息
    options.app_package = 'com.android.calculator2'
    options.app_activity = 'com.android.calculator2.Calculator'

    # 其他设置
    options.no_reset = True  # 不重置应用状态

    # 连接Appium服务器
    driver = webdriver.Remote('http://localhost:4723', options=options)

    return driver
def calculator_operations(driver):
    """执行计算器操作"""
    try:
        # 等待计算器加载完成
        time.sleep(2)

        # 定位数字按钮和操作符
        # 注意:不同设备上的计算器应用可能具有不同的元素ID
        # 这里使用的是Android原生计算器的元素ID

        # 点击数字 7
        btn_7 = driver.find_element(AppiumBy.ID, 'com.android.calculator2:id/digit_7')
        btn_7.click()

        # 点击加号
        btn_plus = driver.find_element(AppiumBy.ID, 'com.android.calculator2:id/op_add')
        btn_plus.click()

        # 点击数字 8
        btn_8 = driver.find_element(AppiumBy.ID, 'com.android.calculator2:id/digit_8')
        btn_8.click()

        # 点击等号
        btn_equals = driver.find_element(AppiumBy.ID, 'com.android.calculator2:id/eq')
        btn_equals.click()

        # 获取结果
        result = driver.find_element(AppiumBy.ID, 'com.android.calculator2:id/result')
        calculated_result = result.text

        print(f"计算结果: 7 + 8 = {calculated_result}")

        # 验证结果是否正确
        expected_result = '15'
        if calculated_result == expected_result:
            print("测试通过!计算结果正确。")
        else:
            print(f"测试失败!期望结果: {expected_result}, 实际结果: {calculated_result}")

        return calculated_result

    except Exception as e:
        print(f"操作过程中出现错误: {str(e)}")
        return None
class CalculatorTest(unittest.TestCase):
    """计算器测试类"""

    def setUp(self):
        """测试前置设置"""
        self.driver = setup_driver()
        self.driver.implicitly_wait(10)  # 设置隐式等待时间

    def tearDown(self):
        """测试后置清理"""
        if self.driver:
            self.driver.quit()

    def test_addition_operation(self):
        """测试加法运算"""
        result = calculator_operations(self.driver)
        self.assertEqual(result, '15', "加法运算结果不正确")

    def test_clear_operation(self):
        """测试清除操作"""
        try:
            # 先输入一些数字
            btn_5 = self.driver.find_element(AppiumBy.ID, 'com.android.calculator2:id/digit_5')
            btn_5.click()

            # 点击清除按钮
            btn_clear = self.driver.find_element(AppiumBy.ID, 'com.android.calculator2:id/clr')
            btn_clear.click()

            # 验证显示区域是否已清除
            result = self.driver.find_element(AppiumBy.ID, 'com.android.calculator2:id/formula')
            current_display = result.text

            # 清除后显示区域应该为空或显示0
            self.assertTrue(not current_display or current_display == '0',
                          "清除操作未正常工作")

        except Exception as e:
            self.fail(f"清除操作测试失败: {str(e)}")
在实际应用中,我们可能会遇到各种复杂的定位情况。以下是一些常用的定位方法:
def advanced_element_locating(driver):
    """演示高级元素定位方法"""

    # 1. 使用XPath定位
    # 通过文本内容定位元素
    element_by_text = driver.find_element(AppiumBy.XPATH, "//*[@text='确定']")

    # 通过部分文本内容定位
    element_by_partial_text = driver.find_element(
        AppiumBy.XPATH, "//*[contains(@text, '确定')]"
    )

    # 2. 使用Accessibility ID定位(通常对应content-desc属性)
    element_by_accessibility = driver.find_element(
        AppiumBy.ACCESSIBILITY_ID, "按钮描述"
    )

    # 3. 使用Class Name定位
    elements_by_class = driver.find_elements(
        AppiumBy.CLASS_NAME, "android.widget.Button"
    )

    # 4. 使用Android UI Automator定位
    element_by_uiautomator = driver.find_element(
        AppiumBy.ANDROID_UIAUTOMATOR,
        'new UiSelector().text("确定")'
    )

    return {
        'by_text': element_by_text,
        'by_partial_text': element_by_partial_text,
        'by_accessibility': element_by_accessibility,
        'by_class': elements_by_class,
        'by_uiautomator': element_by_uiautomator
    }
Appium支持多种手势操作,如滑动、长按、拖拽等:
def gesture_operations(driver):
    """演示手势操作"""

    # 获取屏幕尺寸
    window_size = driver.get_window_size()
    screen_width = window_size['width']
    screen_height = window_size['height']

    # 1. 滑动操作 - 从底部滑动到顶部
    start_x = screen_width / 2
    start_y = screen_height * 0.8
    end_x = screen_width / 2
    end_y = screen_height * 0.2

    driver.swipe(start_x, start_y, end_x, end_y, 1000)

    # 2. 滚动操作
    # 滚动到指定元素
    scroll_to_element = driver.find_element(
        AppiumBy.ANDROID_UIAUTOMATOR,
        'new UiScrollable(new UiSelector().scrollable(true))'
        '.scrollIntoView(new UiSelector().text("目标元素"))'
    )

    # 3. 长按操作
    element_to_long_press = driver.find_element(AppiumBy.ID, 'some.element.id')
    driver.long_press(element_to_long_press)

    # 4. 拖拽操作
    source_element = driver.find_element(AppiumBy.ID, 'source.element')
    target_element = driver.find_element(AppiumBy.ID, 'target.element')
    driver.drag_and_drop(source_element, target_element)
def handle_popups_and_permissions(driver):
    """处理弹窗和权限请求"""

    try:
        # 尝试查找并点击允许按钮
        allow_button = driver.find_element(
            AppiumBy.ID, 'com.android.packageinstaller:id/permission_allow_button'
        )
        allow_button.click()
        print("已处理权限请求")

    except Exception:
        # 如果找不到特定的允许按钮,尝试其他方式
        try:
            # 使用文本定位允许按钮
            allow_by_text = driver.find_element(
                AppiumBy.XPATH, "//*[@text='允许' or @text='ALLOW']"
            )
            allow_by_text.click()
            print("通过文本定位处理了权限请求")

        except Exception:
            print("未找到权限请求弹窗或处理失败")

    # 处理其他类型的弹窗
    try:
        # 查找确定、好的、知道了等按钮
        confirm_buttons = [
            "确定", "确认", "好的", "知道了", "OK", "Okay"
        ]

        for button_text in confirm_buttons:
            try:
                confirm_btn = driver.find_element(
                    AppiumBy.XPATH, f"//*[@text='{button_text}']"
                )
                confirm_btn.click()
                print(f"点击了 {button_text} 按钮")
                break
            except Exception:
                continue

    except Exception as e:
        print(f"处理弹窗时出现错误: {str(e)}")
合理的等待策略对于自动化测试的稳定性至关重要:
from selenium.webdriver.support.ui import WebDriverWait
from selenium.webdriver.support import expected_conditions as EC

def wait_strategies(driver):
    """演示不同的等待策略"""

    # 1. 显式等待 - 等待元素可点击
    wait = WebDriverWait(driver, 10)
    element = wait.until(
        EC.element_to_be_clickable((AppiumBy.ID, 'some.element.id'))
    )
    element.click()

    # 2. 显式等待 - 等待元素可见
    visible_element = wait.until(
        EC.visibility_of_element_located((AppiumBy.ID, 'visible.element'))
    )

    # 3. 显式等待 - 等待元素存在(不一定可见)
    present_element = wait.until(
        EC.presence_of_element_located((AppiumBy.ID, 'present.element'))
    )

    # 4. 自定义等待条件
    def custom_condition(driver):
        """自定义等待条件"""
        try:
            element = driver.find_element(AppiumBy.ID, 'custom.element')
            return element.is_displayed()
        except Exception:
            return False

    custom_element = wait.until(custom_condition)

    return {
        'clickable': element,
        'visible': visible_element,
        'present': present_element,
        'custom': custom_element
    }
下面是一个完整的Appium脚本示例,展示了如何使用Python操作手机:
#!/usr/bin/env python3
"""
Appium手机操作示例
作者:你的名字
日期:2024年1月
描述:使用Python和Appium操作手机计算器应用
"""

import time
import unittest
import logging
from appium import webdriver
from appium.webdriver.common.appiumby import AppiumBy
from appium.options.android import UiAutomator2Options
from selenium.webdriver.support.ui import WebDriverWait
from selenium.webdriver.support import expected_conditions as EC
from selenium.common.exceptions import TimeoutException, NoSuchElementException


# 配置日志
logging.basicConfig(
    level=logging.INFO,
    format='%(asctime)s - %(name)s - %(levelname)s - %(message)s'
)
logger = logging.getLogger(__name__)


class MobileAutomationFramework:
    """移动自动化框架类"""

    def __init__(self, server_url='http://localhost:4723'):
        self.server_url = server_url
        self.driver = None
        self.wait = None

    def setup_driver(self, capabilities_dict=None):
        """设置Appium驱动"""

        if capabilities_dict is None:
            # 默认配置 - Android计算器
            capabilities_dict = {
                'platformName': 'Android',
                'platformVersion': '12',
                'deviceName': 'Android Emulator',
                'automationName': 'UiAutomator2',
                'appPackage': 'com.android.calculator2',
                'appActivity': 'com.android.calculator2.Calculator',
                'noReset': True,
                'newCommandTimeout': 300
            }

        try:
            options = UiAutomator2Options()
            for key, value in capabilities_dict.items():
                setattr(options, key, value)

            logger.info("正在连接Appium服务器...")
            self.driver = webdriver.Remote(self.server_url, options=options)

            # 设置显式等待
            self.wait = WebDriverWait(self.driver, 15)

            logger.info("Appium驱动设置成功")
            return True

        except Exception as e:
            logger.error(f"设置Appium驱动失败: {str(e)}")
            return False

    def teardown(self):
        """清理资源"""
        if self.driver:
            self.driver.quit()
            logger.info("Appium驱动已关闭")

    def find_element_with_wait(self, by, value, timeout=15):
        """带等待的元素查找"""
        wait = WebDriverWait(self.driver, timeout)
        return wait.until(EC.presence_of_element_located((by, value)))

    def safe_click(self, by, value, timeout=15):
        """安全的点击操作"""
        try:
            element = self.find_element_with_wait(by, value, timeout)
            element.click()
            logger.info(f"成功点击元素: {value}")
            return True
        except Exception as e:
            logger.error(f"点击元素失败: {value}, 错误: {str(e)}")
            return False

    def take_screenshot(self, filename=None):
        """截取屏幕截图"""
        if filename is None:
            filename = f"screenshot_{int(time.time())}.png"

        try:
            self.driver.save_screenshot(filename)
            logger.info(f"截图已保存: {filename}")
            return True
        except Exception as e:
            logger.error(f"截图失败: {str(e)}")
            return False

    def get_page_source(self):
        """获取页面源代码"""
        try:
            return self.driver.page_source
        except Exception as e:
            logger.error(f"获取页面源代码失败: {str(e)}")
            return None


class CalculatorAutomation(MobileAutomationFramework):
    """计算器自动化类"""

    def __init__(self):
        super().__init__()
        self.number_mapping = {
            '0': 'digit_0', '1': 'digit_1', '2': 'digit_2',
            '3': 'digit_3', '4': 'digit_4', '5': 'digit_5',
            '6': 'digit_6', '7': 'digit_7', '8': 'digit_8',
            '9': 'digit_9'
        }
        self.operator_mapping = {
            '+': 'op_add', '-': 'op_sub',
            '*': 'op_mul', '/': 'op_div'
        }

    def input_number(self, number):
        """输入数字"""
        if not isinstance(number, (int, str)):
            raise ValueError("数字必须是整数或字符串")

        number_str = str(number)
        for digit in number_str:
            if digit in self.number_mapping:
                element_id = f"com.android.calculator2:id/{self.number_mapping[digit]}"
                self.safe_click(AppiumBy.ID, element_id)
                time.sleep(0.1)  # 短暂延迟,确保输入稳定
            else:
                logger.warning(f"无法识别的数字: {digit}")

    def input_operator(self, operator):
        """输入操作符"""
        if operator not in self.operator_mapping:
            raise ValueError(f"不支持的操作符: {operator}")

        element_id = f"com.android.calculator2:id/{self.operator_mapping[operator]}"
        self.safe_click(AppiumBy.ID, element_id)

    def calculate(self, num1, operator, num2):
        """执行计算"""
        logger.info(f"执行计算: {num1} {operator} {num2}")

        # 输入第一个数字
        self.input_number(num1)

        # 输入操作符
        self.input_operator(operator)

        # 输入第二个数字
        self.input_number(num2)

        # 点击等号
        self.safe_click(AppiumBy.ID, 'com.android.calculator2:id/eq')

        # 获取结果
        return self.get_result()

    def get_result(self):
        """获取计算结果"""
        try:
            result_element = self.find_element_with_wait(
                AppiumBy.ID, 'com.android.calculator2:id/result'
            )
            result = result_element.text
            logger.info(f"计算结果: {result}")
            return result
        except Exception as e:
            logger.error(f"获取结果失败: {str(e)}")
            return None

    def clear_calculator(self):
        """清除计算器"""
        self.safe_click(AppiumBy.ID, 'com.android.calculator2:id/clr')
        logger.info("计算器已清除")


class TestCalculatorOperations(unittest.TestCase):
    """计算器操作测试类"""

    @classmethod
    def setUpClass(cls):
        """测试类设置"""
        cls.calculator = CalculatorAutomation()
        success = cls.calculator.setup_driver()
        if not success:
            raise Exception("无法初始化Appium驱动")

    @classmethod
    def tearDownClass(cls):
        """测试类清理"""
        cls.calculator.teardown()

    def setUp(self):
        """单个测试设置"""
        # 确保每次测试前计算器是清除状态
        self.calculator.clear_calculator()
        time.sleep(1)

    def test_addition(self):
        """测试加法"""
        result = self.calculator.calculate(15, '+', 7)
        self.assertEqual(result, '22', "加法测试失败")

    def test_subtraction(self):
        """测试减法"""
        result = self.calculator.calculate(20, '-', 8)
        self.assertEqual(result, '12', "减法测试失败")

    def test_multiplication(self):
        """测试乘法"""
        result = self.calculator.calculate(6, '*', 9)
        self.assertEqual(result, '54', "乘法测试失败")

    def test_division(self):
        """测试除法"""
        result = self.calculator.calculate(56, '/', 7)
        self.assertEqual(result, '8', "除法测试失败")

    def test_complex_operation(self):
        """测试复杂运算"""
        # 15 + 27 - 8
        self.calculator.input_number(15)
        self.calculator.input_operator('+')
        self.calculator.input_number(27)
        self.calculator.input_operator('-')
        self.calculator.input_number(8)
        self.calculator.safe_click(AppiumBy.ID, 'com.android.calculator2:id/eq')

        result = self.calculator.get_result()
        self.assertEqual(result, '34', "复杂运算测试失败")


def main():
    """主函数"""
    logger.info("开始Appium手机操作演示")

    # 创建计算器自动化实例
    calculator = CalculatorAutomation()

    try:
        # 设置驱动
        if not calculator.setup_driver():
            logger.error("无法启动Appium驱动,程序退出")
            return

        # 执行一系列测试计算
        test_calculations = [
            (8, '+', 4),
            (15, '-', 6),
            (7, '*', 9),
            (81, '/', 9)
        ]

        for num1, op, num2 in test_calculations:
            result = calculator.calculate(num1, op, num2)
            expected = str(eval(f"{num1}{op}{num2}"))

            if result == expected:
                logger.info(f"✓ {num1} {op} {num2} = {result} (正确)")
            else:
                logger.error(f"✗ {num1} {op} {num2} = {result} (期望: {expected})")

        # 截取屏幕截图
        calculator.take_screenshot("calculator_final_state.png")

        logger.info("Appium手机操作演示完成")

    except Exception as e:
        logger.error(f"程序执行过程中出现错误: {str(e)}")

    finally:
        # 确保资源被正确清理
        calculator.teardown()


if __name__ == "__main__":
    # 可以直接运行演示
    main()

    # 或者运行单元测试
    # unittest.main(verbosity=2)
问题:无法连接到Appium服务器
解决方案:
- 确保Appium服务器正在运行:appium
- 检查端口是否被占用,默认端口是4723
- 验证URL格式:http://localhost:4723
问题:脚本无法找到指定元素
解决方案:
- 增加等待时间,使用显式等待
- 使用不同的定位策略
- 检查应用是否已正确启动
- 使用Appium Desktop的Inspector工具验证元素定位
问题:应用权限请求导致脚本中断
解决方案:
- 在Desired Capabilities中设置autoGrantPermissions: true
- 在脚本中添加权限处理逻辑
- 手动预先授予应用所需权限
问题:脚本运行缓慢
解决方案:
- 减少不必要的等待时间
- 使用更高效的元素定位策略
- 避免频繁的页面源代码获取
- 考虑使用更快的测试设备或模拟器
使用Page Object模式将页面元素和操作封装成类
将配置信息与测试逻辑分离
使用配置文件或环境变量管理设备信息和应用信息
实现完善的异常处理机制
添加重试机制处理偶发性失败
使用日志记录详细的操作信息
使用有意义的变量名和函数名
添加清晰的注释和文档
定期更新Appium和相关依赖
通过本文的介绍,我们学习了如何使用Python和Appium来操作手机应用。从环境搭建到基础操作,再到高级技巧,我们覆盖了使用Appium进行移动自动化的关键知识点。
Appium作为一个强大的跨平台移动自动化工具,结合Python的简洁语法,为我们提供了强大的手机操作能力。无论是进行自动化测试还是实现复杂的手机操作流程,Appium都是一个值得掌握的技能。
随着移动应用的不断发展,掌握移动自动化技术将会变得越来越重要。希望本文能够为你提供一个良好的起点,帮助你在移动自动化的道路上走得更远。
注意:在实际使用中,请根据你的具体设备和应用调整代码中的元素定位信息和配置参数。不同的设备和应用版本可能会有差异,需要灵活调整脚本。
到此这篇关于Python使用Appium实现自动化操作手机入门教学的文章就介绍到这了,更多相关Python Appium操作手机内容请搜索风君子博客以前的文章或继续浏览下面的相关文章希望大家以后多多支持风君子博客!
您可能感兴趣的文章:
- Python实现Appium录屏功能示例代码
- Python+Appium自动化操作微信的教程分享
- APPium+Python编写真机移动端自动化脚本的项目实践
- Python利用appium实现模拟手机滑动操控的操作
- python和Appium移动端多设备自动化测试框架实现
- python+appium自动化测试之如何控制App的启动和退出
- Appium+Python+pytest自动化测试框架的实战