文章目录
- 首先,我们有一个简单的Flask应用wisdom_app.py,它会随机显示编程名言和有趣的图片。 import random import os from flask import Flask, render_template_string app = Flask(__name__) # 有趣的名言列表 quotes = [ {“text”: “Debugging is like being a detective in a crime movie where you are also the murderer.”, “author”: “Filipe Fortes”}, {“text”: “If you want your code to be fast, it should be easy to understand.”, “author”: “Brian Kernighan”}, {“text”: “The best thing about a boolean is even if you are wrong, you are only off by a bit.”, “author”: “Anonymous”}, {“text”: “There are two ways to write error-free programs; only the third one works.”, “author”: “Alan J. Perlis”}, {“text”: “Programming is like sex: One mistake and you have to support it for the rest of your life.”, “author”: “Michael Sinz”} ] # 有趣的动物图片URL列表 animal_images = [ “https://picsum.photos/seed/funnycat/400/300”, “https://picsum.photos/seed/lazydog/400/300”, “https://picsum.photos/seed/sillyrabbit/400/300”, “https://picsum.photos/seed/curiousgoat/400/300”, “https://picsum.photos/seed/playfulpanda/400/300” ] @app.route(‘/’) def get_random_wisdom(): quote = random.choice(quotes) image_url = random.choice(animal_images) # 简单的HTML模板,用于展示名言和图片 html_template = “”” <!DOCTYPE html> <html> <head> <title>智慧之言</title> <style> body { font-family: Arial, sans-serif; max-width: 800px; margin: 0 auto; padding: 20px; text-align: center; } .quote-box { background-color: #f9f9f9; border-left: 10px solid #ccc; margin: 1.5em 10px; padding: 1em 20px; font-size: 1.2em; border-radius: 5px; } .author { color: #666; font-style: italic; margin-top: 10px; } .image-container { margin-top: 30px; border-radius: 8px; overflow: hidden; box-shadow: 0 4px 8px rgba(0,0,0,0.1); } img { max-width: 100%; height: auto; } button { background-color: #4CAF50; border: none; color: white; padding: 10px 20px; text-align: center; text-decoration: none; display: inline-block; font-size: 16px; margin: 20px 2px; cursor: pointer; border-radius: 5px; transition: background-color 0.3s; } button:hover { background-color: #45a049; } </style> </head> <body> <h1>今日智慧</h1> <div class=”quote-box”> “{{ quote_text }}” <div class=”author”>- {{ quote_author }}</div> </div> <div class=”image-container”> <img src=”{{ image_url }}” alt=”有趣的动物”> </div> <button onclick=”window.location.reload()”>换一条</button> </body> </html> “”” return render_template_string( html_template, quote_text=quote[“text”], quote_author=quote[“author”], image_url=image_url ) if __name__ == ‘__main__’: # 获取端口号,默认为5000 port = int(os.environ.get(‘PORT’, 5000)) app.run(host=’0.0.0.0′, port=port)
- 列出项目所需的Python依赖: flask==2.3.2 importlib-metadata>=3.6.0 Werkzeug==2.3.7
- Dockerfile是构建镜像的核心文件,我们使用多阶段构建来优化镜像大小: # 使用完整的 Python 3.9 镜像(基于 Debian Bullseye) FROM python:3.9 AS builder # 确保 sources.list 文件存在并覆盖为阿里云镜像源(Bullseye 版本) RUN test -f /etc/apt/sources.list || touch /etc/apt/sources.list && sed -i ‘s|deb.debian.org|mirrors.aliyun.com/debian|g’ /etc/apt/sources.list && sed -i ‘s|security.debian.org|mirrors.aliyun.com/debian-security|g’ /etc/apt/sources.list && echo “deb http://mirrors.aliyun.com/debian/ bullseye main contrib non-free” > /etc/apt/sources.list && echo “deb http://mirrors.aliyun.com/debian/ bullseye-updates main contrib non-free” >> /etc/apt/sources.list && echo “deb http://mirrors.aliyun.com/debian-security bullseye-security main contrib non-free” >> /etc/apt/sources.list # 安装系统依赖(先清理缓存再更新) RUN apt-get clean && apt-get update && apt-get install -y –no-install-recommends build-essential && rm -rf /var/lib/apt/lists/* # 升级 pip 并安装依赖 RUN pip install –upgrade pip setuptools wheel && pip install importlib-metadata>=3.6.0 # 复制并安装 Python 依赖(使用阿里云 PyPI 源加速) WORKDIR /app COPY requirements.txt . RUN pip install –no-cache-dir -i https://mirrors.aliyun.com/pypi/simple/ -r requirements.txt # 最终运行镜像 FROM python:3.9-slim # 同样切换为阿里云镜像源(Bullseye 版本) RUN test -f /etc/apt/sources.list || touch /etc/apt/sources.list && sed -i ‘s|deb.debian.org|mirrors.aliyun.com/debian|g’ /etc/apt/sources.list && sed -i ‘s|security.debian.org|mirrors.aliyun.com/debian-security|g’ /etc/apt/sources.list && echo “deb http://mirrors.aliyun.com/debian/ bullseye main contrib non-free” > /etc/apt/sources.list && echo “deb http://mirrors.aliyun.com/debian/ bullseye-updates main contrib non-free” >> /etc/apt/sources.list && echo “deb http://mirrors.aliyun.com/debian-security bullseye-security main contrib non-free” >> /etc/apt/sources.list # 安装运行时依赖 RUN apt-get clean && apt-get update && apt-get install -y –no-install-recommends libgomp1 && rm -rf /var/lib/apt/lists/* # 复制构建产物和应用代码 WORKDIR /app COPY –from=builder /usr/local/lib/python3.9/site-packages/ /usr/local/lib/python3.9/site-packages/ COPY wisdom_app.py . # 暴露端口并启动应用 EXPOSE 5000 ENV FLASK_APP=wisdom_app.py CMD [“flask”, “run”, “–host=0.0.0.0”]
- 忽略不需要的文件,减小镜像体积: __pycache__ *.pyc *.pyo *.pyd .venv env
- 打开cmd,cd到项目目录,执行以下命令构建镜像: docker build -t wisdom-app:latest . 参数说明: -t wisdom-app:latest :为镜像指定名称和标签 . :使用当前目录中的Dockerfile
- 构建完成后,可以使用以下命令运行容器: docker run -it -p 5000:5000 wisdom-app:latest 或者使用: docker run -it -p 5000:5000 wisdom-app:latest python -m flask run –host=0.0.0.0 参数说明: -it:以交互模式运行容器 -p 5000:5000:将容器的5000端口映射到主机的5000端口 –host=0.0.0.0:允许外部访问Flask应用
- 在浏览器中访问http://localhost:5000,你应该能看到随机显示的名言和图片。
- 查看运行中的容器: docker ps 停止容器: docker stop <容器ID> 删除容器: docker rm <容器ID> 删除镜像: docker rmi wisdom-app:latest 进入运行中的容器: docker exec -it <容器ID> /bin/bash
目录
- 前言
- 准备工作
- 项目结构
- 具体步骤
- 1. 创建Python Flask应用
- 2. 创建requirements.txt
- 3. 编写Dockerfile(注意文件名没有后缀)
- 4. 创建.dockerignore文件
- 5. 构建Docker镜像
- 6. 运行Docker容器
- 7. 测试应用
- 8. 其他有用的Docker命令
- 常见问题解决
在现代软件开发中,容器化技术已经成为部署应用程序的标准方式之一。Docker作为最流行的容器化平台,能够帮助开发者轻松打包、分发和运行应用程序。本文将详细介绍如何将一个简单的Python Flask服务打包成Docker镜像并运行。
在开始之前,请确保你的系统已经安装了以下工具:
1.Docker(官方安装指南)
2.Python 3.x(可选,用于本地测试)
我们的项目包含以下文件:
.
├── Dockerfile
├── .dockerignore
├── requirements.txt
└── wisdom_app.py
首先,我们有一个简单的Flask应用wisdom_app.py,它会随机显示编程名言和有趣的图片。
import random
import os
from flask import Flask, render_template_string

app = Flask(__name__)

# 有趣的名言列表
quotes = [
    {"text": "Debugging is like being a detective in a crime movie where you are also the murderer.", "author": "Filipe Fortes"},
    {"text": "If you want your code to be fast, it should be easy to understand.", "author": "Brian Kernighan"},
    {"text": "The best thing about a boolean is even if you are wrong, you are only off by a bit.", "author": "Anonymous"},
    {"text": "There are two ways to write error-free programs; only the third one works.", "author": "Alan J. Perlis"},
    {"text": "Programming is like sex: One mistake and you have to support it for the rest of your life.", "author": "Michael Sinz"}
]

# 有趣的动物图片URL列表
animal_images = [
    "https://picsum.photos/seed/funnycat/400/300",
    "https://picsum.photos/seed/lazydog/400/300",
    "https://picsum.photos/seed/sillyrabbit/400/300",
    "https://picsum.photos/seed/curiousgoat/400/300",
    "https://picsum.photos/seed/playfulpanda/400/300"
]

@app.route('/')
def get_random_wisdom():
    quote = random.choice(quotes)
    image_url = random.choice(animal_images)

    # 简单的HTML模板,用于展示名言和图片
    html_template = """
    <!DOCTYPE html>
    <html>
    <head>
        <title>智慧之言</title>
        <style>
            body {
                font-family: Arial, sans-serif;
                max-width: 800px;
                margin: 0 auto;
                padding: 20px;
                text-align: center;
            }
            .quote-box {
                background-color: #f9f9f9;
                border-left: 10px solid #ccc;
                margin: 1.5em 10px;
                padding: 1em 20px;
                font-size: 1.2em;
                border-radius: 5px;
            }
            .author {
                color: #666;
                font-style: italic;
                margin-top: 10px;
            }
            .image-container {
                margin-top: 30px;
                border-radius: 8px;
                overflow: hidden;
                box-shadow: 0 4px 8px rgba(0,0,0,0.1);
            }
            img {
                max-width: 100%;
                height: auto;
            }
            button {
                background-color: #4CAF50;
                border: none;
                color: white;
                padding: 10px 20px;
                text-align: center;
                text-decoration: none;
                display: inline-block;
                font-size: 16px;
                margin: 20px 2px;
                cursor: pointer;
                border-radius: 5px;
                transition: background-color 0.3s;
            }
            button:hover {
                background-color: #45a049;
            }
        </style>
    </head>
    <body>
        <h1>今日智慧</h1>
        <div class="quote-box">
            "{{ quote_text }}"
            <div class="author">- {{ quote_author }}</div>
        </div>
        <div class="image-container">
            <img src="{{ image_url }}" alt="有趣的动物">
        </div>
        <button onclick="window.location.reload()">换一条</button>
    </body>
    </html>
    """

    return render_template_string(
        html_template,
        quote_text=quote["text"],
        quote_author=quote["author"],
        image_url=image_url
    )

if __name__ == '__main__':
    # 获取端口号,默认为5000
    port = int(os.environ.get('PORT', 5000))
    app.run(host='0.0.0.0', port=port)
列出项目所需的Python依赖:
flask==2.3.2
importlib-metadata>=3.6.0
Werkzeug==2.3.7
Dockerfile是构建镜像的核心文件,我们使用多阶段构建来优化镜像大小:
# 使用完整的 Python 3.9 镜像(基于 Debian Bullseye)
FROM python:3.9 AS builder

# 确保 sources.list 文件存在并覆盖为阿里云镜像源(Bullseye 版本)
RUN test -f /etc/apt/sources.list || touch /etc/apt/sources.list &&
    sed -i 's|deb.debian.org|mirrors.aliyun.com/debian|g' /etc/apt/sources.list &&
    sed -i 's|security.debian.org|mirrors.aliyun.com/debian-security|g' /etc/apt/sources.list &&
    echo "deb http://mirrors.aliyun.com/debian/ bullseye main contrib non-free" > /etc/apt/sources.list &&
    echo "deb http://mirrors.aliyun.com/debian/ bullseye-updates main contrib non-free" >> /etc/apt/sources.list &&
    echo "deb http://mirrors.aliyun.com/debian-security bullseye-security main contrib non-free" >> /etc/apt/sources.list

# 安装系统依赖(先清理缓存再更新)
RUN apt-get clean &&
    apt-get update &&
    apt-get install -y --no-install-recommends build-essential &&
    rm -rf /var/lib/apt/lists/*

# 升级 pip 并安装依赖
RUN pip install --upgrade pip setuptools wheel &&
    pip install importlib-metadata>=3.6.0

# 复制并安装 Python 依赖(使用阿里云 PyPI 源加速)
WORKDIR /app
COPY requirements.txt .
RUN pip install --no-cache-dir -i https://mirrors.aliyun.com/pypi/simple/ -r requirements.txt

# 最终运行镜像
FROM python:3.9-slim

# 同样切换为阿里云镜像源(Bullseye 版本)
RUN test -f /etc/apt/sources.list || touch /etc/apt/sources.list &&
    sed -i 's|deb.debian.org|mirrors.aliyun.com/debian|g' /etc/apt/sources.list &&
    sed -i 's|security.debian.org|mirrors.aliyun.com/debian-security|g' /etc/apt/sources.list &&
    echo "deb http://mirrors.aliyun.com/debian/ bullseye main contrib non-free" > /etc/apt/sources.list &&
    echo "deb http://mirrors.aliyun.com/debian/ bullseye-updates main contrib non-free" >> /etc/apt/sources.list &&
    echo "deb http://mirrors.aliyun.com/debian-security bullseye-security main contrib non-free" >> /etc/apt/sources.list

# 安装运行时依赖
RUN apt-get clean &&
    apt-get update &&
    apt-get install -y --no-install-recommends libgomp1 &&
    rm -rf /var/lib/apt/lists/*

# 复制构建产物和应用代码
WORKDIR /app
COPY --from=builder /usr/local/lib/python3.9/site-packages/ /usr/local/lib/python3.9/site-packages/
COPY wisdom_app.py .

# 暴露端口并启动应用
EXPOSE 5000
ENV FLASK_APP=wisdom_app.py
CMD ["flask", "run", "--host=0.0.0.0"]
忽略不需要的文件,减小镜像体积:
__pycache__
*.pyc
*.pyo
*.pyd
.venv
env
打开cmd,cd到项目目录,执行以下命令构建镜像:
docker build -t wisdom-app:latest .
参数说明:
-t wisdom-app:latest :为镜像指定名称和标签
. :使用当前目录中的Dockerfile
构建完成后,可以使用以下命令运行容器:
docker run -it -p 5000:5000 wisdom-app:latest
或者使用:
docker run -it -p 5000:5000 wisdom-app:latest python -m flask run --host=0.0.0.0
参数说明:
-it:以交互模式运行容器
-p 5000:5000:将容器的5000端口映射到主机的5000端口
--host=0.0.0.0:允许外部访问Flask应用
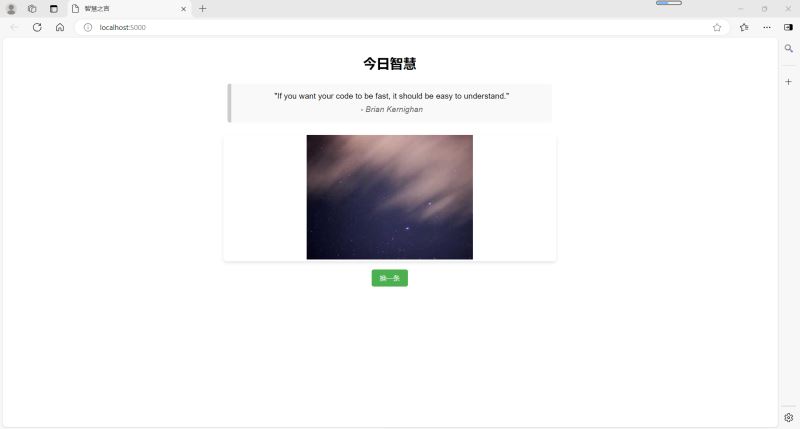
在浏览器中访问http://localhost:5000,你应该能看到随机显示的名言和图片。
查看运行中的容器:
docker ps
停止容器:
docker stop <容器ID>
删除容器:
docker rm <容器ID>
删除镜像:
docker rmi wisdom-app:latest
进入运行中的容器:
docker exec -it <容器ID> /bin/bash
端口冲突:如果5000端口已被占用,可以修改映射端口,如-p 5001:5000
构建缓慢:确保使用了国内镜像源(如阿里云),如Dockerfile中所示
容器立即退出:检查应用是否有错误日志,使用docker logs <容器ID>查看
无法访问应用:确保容器正确运行,并且防火墙允许对应端口的访问
以上就是将Python Flask服务打包成Docker镜像并运行的完整指南的详细内容,更多关于Python Flask打包成Docker镜像的资料请关注风君子博客其它相关文章!
您可能感兴趣的文章:
- python flask项目打包成docker镜像发布的过程
- Dockerfile构建一个Python Flask 镜像
- 将python flask项目打包成可以运行的软件的全过程(包含报错解决)