文章目录
- # 音频处理相关 pip install sounddevice soundfile pyaudio # 语音识别 pip install faster-whisper # HTTP请求 pip install requests # 语音合成(可选,如果使用edge-tts) pip install edge-tts
- Windows 系统 # 使用 Chocolatey 安装 FFmpeg(推荐) choco install ffmpeg # 或者手动下载 FFmpeg 并添加到系统 PATH # 下载地址:https://ffmpeg.org/download.html Linux/macOS 系统 # Ubuntu/Debian sudo apt update sudo apt install ffmpeg # macOS brew install ffmpeg
- # 安装 Ollama curl -fsSL https://ollama.ai/install.sh | sh # 拉取模型(选择其中一个) ollama pull yi:9b # 或者 ollama pull llama3-8b # 启动 Ollama 服务 ollama serve
- def record_audio(filename=”input.wav”, duration=5, fs=16000): print(“🎤 正在录音,请开始说话…”) audio = sd.rec(int(duration * fs), samplerate=fs, channels=1) sd.wait() sf.write(filename, audio, fs) print(“✅ 录音完成”) 技术要点: 使用 sounddevice 进行实时音频录制 采样率设置为 16kHz,单声道录制 默认录制时长 5 秒 使用 soundfile 保存为 WAV 格式
- def transcribe_whisper(filename=”input.wav”): print(“🧠 Whisper 正在识别语音…”) model = WhisperModel(“medium”, compute_type=”int8″) segments, _ = model.transcribe(filename, beam_size=5) text = “”.join([seg.text for seg in segments]) print(f”📝 识别结果:{text}”) return text 技术要点: 使用 faster-whisper 库,比原版 Whisper 更快 选择 “medium” 模型,平衡准确性和速度 compute_type="int8" 量化加速,减少内存占用 beam_size=5 提高识别准确率
- def chat_with_ollama(prompt): print(“💬 发送给 Ollama 中…”) response = requests.post(“http://localhost:11434/api/generate”, json={ “model”: OLLAMA_MODEL, “prompt”: prompt, “stream”: False }) answer = response.json()[“response”] print(f”🤖 Ollama 回复:{answer}”) return answer 技术要点: 通过 HTTP API 与 Ollama 服务通信(支持本地或远程部署) 支持多种模型:yi:9b、llama3-8b 等 stream=False 获取完整回复 可配置本地部署(http://localhost:11434)或远程服务
- def speak_text(text, output=”reply.wav”): print(“🔊 正在生成语音…”) tts_command = f”echo ‘{text}’ | edge-tts –voice zh-CN-XiaoxiaoNeural –write-media {output}” subprocess.run(tts_command, shell=True) print(“🔈 播放中…”) subprocess.run([“ffplay”, “-nodisp”, “-autoexit”, output]) 技术要点: 使用 Microsoft Edge TTS 引擎 选择中文女声 “zh-CN-XiaoxiaoNeural” 使用 FFplay 播放生成的音频文件 支持多种语音选择
- 模型大小 内存占用 识别速度 准确率 tiny ~39MB 最快 较低 base ~74MB 快 中等 small ~244MB 中等 良好 medium ~769MB 较慢 很好 large ~1550MB 最慢 最佳
- # 不同计算类型的性能对比 model = WhisperModel(“medium”, compute_type=”int8″) # 推荐:速度快,内存少 model = WhisperModel(“medium”, compute_type=”float16″) # 平衡:中等速度和精度 model = WhisperModel(“medium”, compute_type=”float32″) # 最高精度,最慢速度
- # 根据使用场景调整参数 record_audio(duration=3, fs=16000) # 短对话 record_audio(duration=10, fs=22050) # 长对话,更高音质
目录
- 项目简介
- 技术架构
- 实现效果
- 环境准备
- 1. 安装必需的 Python 包
- 2. 系统依赖
- 3. Ollama 模型部署
- 完整源代码
- 功能详解
- 1. 语音录制模块
- 2. 语音识别模块
- 3. AI对话模块
- 4. 语音合成模块
- 使用说明
- 1. 启动准备
- 2. 交互流程
- 性能优化建议
- 1. Whisper 模型选择
- 2. 计算类型优化
- 3. 录音参数调优
- 故障排除
- 扩展功能
- 总结
本项目是一个基于 Python 的智能语音助手,集成了语音录制、语音识别、AI对话和语音合成功能。用户可以通过语音与本地部署的 Ollama 大模型进行自然对话。
核心功能模块
语音录制 – 使用 sounddevice 录制用户语音
语音识别 – 使用 faster-whisper 将语音转换为文本
AI对话 – 与本地 Ollama 模型进行文本对话
语音合成 – 使用 edge-tts 将AI回复转换为语音并播放
工作流程
用户语音输入 → 录音 → 语音识别 → AI对话 → 语音合成 → 语音播放
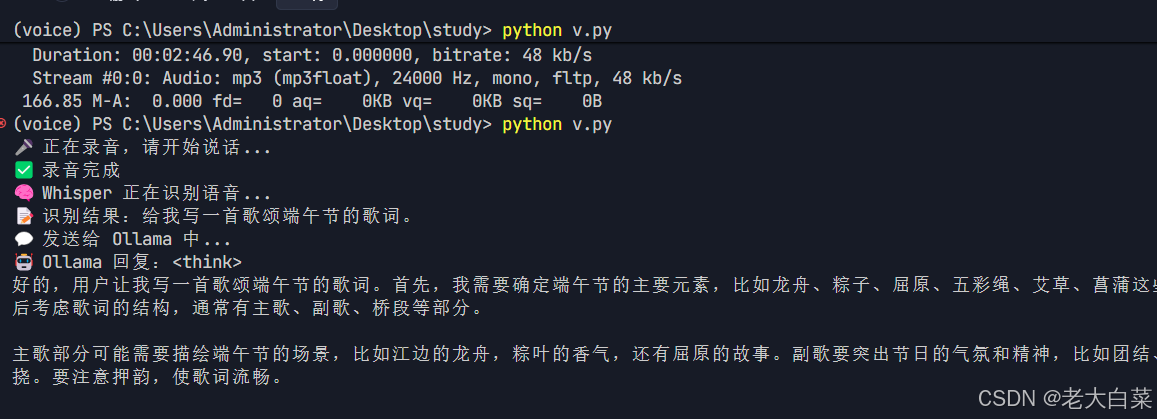
# 音频处理相关
pip install sounddevice soundfile pyaudio

# 语音识别
pip install faster-whisper

# HTTP请求
pip install requests

# 语音合成(可选,如果使用edge-tts)
pip install edge-tts
Windows 系统
# 使用 Chocolatey 安装 FFmpeg(推荐)
choco install ffmpeg

# 或者手动下载 FFmpeg 并添加到系统 PATH
# 下载地址:https://ffmpeg.org/download.html
Linux/macOS 系统
# Ubuntu/Debian
sudo apt update
sudo apt install ffmpeg

# macOS
brew install ffmpeg
# 安装 Ollama
curl -fsSL https://ollama.ai/install.sh | sh

# 拉取模型(选择其中一个)
ollama pull yi:9b
# 或者
ollama pull llama3-8b

# 启动 Ollama 服务
ollama serve
import subprocess
import sounddevice as sd
import soundfile as sf
from faster_whisper import WhisperModel
import requests

OLLAMA_MODEL = "yi:9b"  # 或者 llama3-8b,已在 Ollama 里拉取好的模型

# 录音函数,录制音频并保存为 input.wav
def record_audio(filename="input.wav", duration=5, fs=16000):
    print("🎤 正在录音,请开始说话...")
    audio = sd.rec(int(duration * fs), samplerate=fs, channels=1)
    sd.wait()
    sf.write(filename, audio, fs)
    print("✅ 录音完成")

# 语音识别函数,调用 WhisperModel 将音频转为文本
def transcribe_whisper(filename="input.wav"):
    print("🧠 Whisper 正在识别语音...")
    model = WhisperModel("medium", compute_type="int8")
    segments, _ = model.transcribe(filename, beam_size=5)
    text = "".join([seg.text for seg in segments])
    print(f"📝 识别结果:{text}")
    return text

# 与 Ollama 大模型对话,获取回复
def chat_with_ollama(prompt):
    print("💬 发送给 Ollama 中...")
    response = requests.post("http://ollama.jjsos.cn/api/generate", json={
        "model": OLLAMA_MODEL,
        "prompt": prompt,
        "stream": False
    })
    answer = response.json()["response"]
    print(f"🤖 Ollama 回复:{answer}")
    return answer

# 语音合成与播放,将文本转为语音并播放
def speak_text(text, output="reply.wav"):
    """文本转语音并播放"""
    print("🔊 正在生成语音...")
    try:
        # 直接使用 edge-tts 命令,避免 echo 管道问题
        tts_command = ["edge-tts", "--text", text, "--voice", "zh-CN-XiaoxiaoNeural", "--write-media", output]
        result = subprocess.run(tts_command, capture_output=True, text=True)

        # 检查命令是否成功执行
        if result.returncode != 0:
            print(f"❌ 语音合成失败: {result.stderr}")
            return

        # 检查文件是否存在
        import os
        if not os.path.exists(output):
            print(f"❌ 音频文件 {output} 未生成")
            return

        print("🔈 播放中...")
        subprocess.run(["ffplay", "-nodisp", "-autoexit", output])

    except Exception as e:
        print(f"❌ 语音合成或播放出错: {e}")

# 主流程:录音 -> 语音识别 -> AI对话 -> 语音合成与播放
if __name__ == "__main__":
    record_audio()  # 录音
    user_text = transcribe_whisper()  # 语音转文本
    reply_text = chat_with_ollama(user_text)  # AI对话
    speak_text(reply_text)  # 语音合成与播放
def record_audio(filename="input.wav", duration=5, fs=16000):
    print("🎤 正在录音,请开始说话...")
    audio = sd.rec(int(duration * fs), samplerate=fs, channels=1)
    sd.wait()
    sf.write(filename, audio, fs)
    print("✅ 录音完成")
技术要点:
使用 sounddevice 进行实时音频录制
采样率设置为 16kHz,单声道录制
默认录制时长 5 秒
使用 soundfile 保存为 WAV 格式
def transcribe_whisper(filename="input.wav"):
    print("🧠 Whisper 正在识别语音...")
    model = WhisperModel("medium", compute_type="int8")
    segments, _ = model.transcribe(filename, beam_size=5)
    text = "".join([seg.text for seg in segments])
    print(f"📝 识别结果:{text}")
    return text
技术要点:
使用 faster-whisper 库,比原版 Whisper 更快
选择 “medium” 模型,平衡准确性和速度
compute_type="int8" 量化加速,减少内存占用
beam_size=5 提高识别准确率
def chat_with_ollama(prompt):
    print("💬 发送给 Ollama 中...")
    response = requests.post("http://localhost:11434/api/generate", json={
        "model": OLLAMA_MODEL,
        "prompt": prompt,
        "stream": False
    })
    answer = response.json()["response"]
    print(f"🤖 Ollama 回复:{answer}")
    return answer
技术要点:
通过 HTTP API 与 Ollama 服务通信(支持本地或远程部署)
支持多种模型:yi:9b、llama3-8b 等
stream=False 获取完整回复
可配置本地部署(http://localhost:11434)或远程服务
def speak_text(text, output="reply.wav"):
    print("🔊 正在生成语音...")
    tts_command = f"echo '{text}' | edge-tts --voice zh-CN-XiaoxiaoNeural --write-media {output}"
    subprocess.run(tts_command, shell=True)
    print("🔈 播放中...")
    subprocess.run(["ffplay", "-nodisp", "-autoexit", output])
技术要点:
使用 Microsoft Edge TTS 引擎
选择中文女声 “zh-CN-XiaoxiaoNeural”
使用 FFplay 播放生成的音频文件
支持多种语音选择
# 1. 确保 Ollama 服务运行
ollama serve

# 2. 运行语音助手
python v.py
- 程序启动后自动开始录音(5秒)
- 录音结束后进行语音识别
- 识别结果发送给 Ollama 模型
- AI 回复转换为语音并播放
| 模型大小 | 内存占用 | 识别速度 | 准确率 |
|---|---|---|---|
| tiny | ~39MB | 最快 | 较低 |
| base | ~74MB | 快 | 中等 |
| small | ~244MB | 中等 | 良好 |
| medium | ~769MB | 较慢 | 很好 |
| large | ~1550MB | 最慢 | 最佳 |
# 不同计算类型的性能对比
model = WhisperModel("medium", compute_type="int8")    # 推荐:速度快,内存少
model = WhisperModel("medium", compute_type="float16") # 平衡:中等速度和精度
model = WhisperModel("medium", compute_type="float32") # 最高精度,最慢速度
# 根据使用场景调整参数
record_audio(duration=3, fs=16000)   # 短对话
record_audio(duration=10, fs=22050)  # 长对话,更高音质
常见问题
1.录音设备问题
# 查看可用音频设备
import sounddevice as sd
print(sd.query_devices())
2.Ollama 连接失败
# 检查 Ollama 服务状态
curl http://localhost:11434/api/tags
3.语音合成失败
# 测试 edge-tts
edge-tts --list-voices | grep zh-CN
4.FFmpeg 播放问题
# 检查 FFmpeg 安装
ffplay -version
1. 添加唤醒词检测
# 可集成 pvporcupine 实现唤醒词功能
pip install pvporcupine
2. 支持多轮对话
# 添加对话历史管理
conversation_history = []
3. 语音情感识别
# 可集成情感分析库
pip install transformers torch
本项目展示了如何构建一个完整的语音助手系统,涵盖了从语音输入到语音输出的完整链路。通过本地部署的方式,既保证了响应速度,又保护了用户隐私。
项目特点:
- 隐私保护:所有处理都在本地完成
- 响应迅速:优化的模型配置和本地部署
- 易于扩展:模块化设计,便于功能扩展
- 成本低廉:无需调用付费API
适用场景:
- 个人语音助手
- 智能家居控制
- 语音笔记工具
- 教育辅助工具
到此这篇关于Python调用本地ollama大模型实现智能语音助手的文章就介绍到这了,更多相关Python ollama智能语音助手内容请搜索风君子博客以前的文章或继续浏览下面的相关文章希望大家以后多多支持风君子博客!
您可能感兴趣的文章:
- Python ollama的搭建与使用流程分析
- Python实现Ollama的提示词生成与优化
- Python调用Ollama库本地大语言模型使用详解
- Python使用Ollama API的详细代码示例
- Python调用ollama本地大模型进行批量识别PDF
- python+ollama自己写代码调用本地deepseek模型