文章目录
- 以管理员权限打开命令行窗口,执行下面的命令: python -m pip install –upgrade pip -i https://pypi.tuna.tsinghua.edu.cn/simple
- 以管理员权限打开命令行窗口,执行下面的命令: pip install psycopg2 -i https://pypi.tuna.tsinghua.edu.cn/simple 报错:ERROR: Cannot determine archive format of C:UserstttzzAppDataLocalTemppip-req-build-rrzp7n41
- 以管理员权限打开命令行窗口,执行下面的命令: pip install -i https://pypi.tuna.tsinghua.edu.cn/simple –trusted-host pypi.tuna.tsinghua.edu.cn psycopg2
- pip install -i https://pypi.tuna.tsinghua.edu.cn/simple –trusted-host pypi.tuna.tsinghua.edu.cn chardet PyCharm下安装chardet插件,安装完毕。
- pip list 从上面的清单,发现插件chardet及psycopg2都安装成功了,下面开始来创建Python文件来对PostgreSQL数据库进行操作。
- PostgreSQLExecuteSql.py 上代码: #!/usr/bin/python # -*- coding: UTF-8 -*- import chardet import psycopg2 import psycopg2.extras class PostgreSQLExecuteSql: “”” Python Test Library for TZQ “”” def __init__(self): pass def get_encoding(self, file): # 获取文件编码类型 # 二进制方式读取,获取字节数据,检测类型 with open(file, ‘rb’) as f: return chardet.detect(f.read())[‘encoding’] # 输出文件所有内容 def get_file_content1(self, file_path): # filePath=”d:/20220711-1657.sql” file_encoding = self.get_encoding(file_path) # print(get_encoding(filePath)) file = open(file_path, “r”, encoding=file_encoding) # print(file.read()) str = file.read() file.close() return str # 按行输出文件内容 def get_file_content2(self, filePath): # filePath=”d:/20220711-1657.sql” file_encoding = self.get_encoding(filePath) print(self.get_encoding(filePath)) file = open(filePath, “r”, encoding=file_encoding) # print(file.readline()) str = file.readline() file.close() return str # for循环读取文件内容 def get_file_content3(self, filePath): with open(filePath, “r”, encoding=self.get_encoding(filePath)) as file: for item in file: print(“file_content:” + item) # conn = psycopg2.connect(“dbname=tzqlog_pro user=tzq password=Tzq@123456 host=127.0.0.1 port=5432”) # 连接数据库执行脚本 def conn_db_exec_sql(self, sql_script, dbname, user, password, host, port): connect_string = “dbname=” + dbname + ” user=” + user + ” password=” + password + ” host=” + host + ” port=” + port print(connect_string) # 连接到数据库 conn = psycopg2.connect(connect_string) # 建立游标,用来执行数据库操作 # 这⾥创建的是⼀个字典Cursor, 这样返回的数据, 都是字典的形式, ⽅便使⽤ # cursor = conn.cursor() cursor = conn.cursor(cursor_factory=psycopg2.extras.DictCursor) # 读取文本文件中的内容 file_content = self.get_file_content1(sql_script) # 执行SQL命令 cursor.execute(file_content) # 提交SQL命令 conn.commit() # 执行SQL SELECT命令 # command = ‘SELECT * FROM test_conn ‘ # cursor.execute(command) ## 获取SELECT返回的元组 # rows = cursor.fetchall() # 关闭数据库连接 conn.close() # print(rows) “””TZQLOG””” # 连接数据库执行脚本 – TZQLOG PRO 环境 def exec_sql__TZQLOG_DB_PRO(self, sql_script): # 配置项 dbname = “tzqlog_db_pro” user = “plan” password = “Tzq@123456” host = “127.0.0.1” port = “5432” self.conn_db_exec_sql(sql_script, dbname, user, password, host, port) # if __name__ == ‘__main__’: # postgreSQLExecuteSql = PostgreSQLExecuteSql() # # 执行的脚本文件全路径 # sql_file_path = “D:/20220706-1736-tzqlog_XXX.sql” # # 在 TZQLOG PRO 执行脚本 # postgreSQLExecuteSql.exec_sql__TZQLOG_DB_PRO(sql_file_path)
- execute_db_script.py 上代码: #!/usr/bin/python # -*- coding: UTF-8 -*- import PostgreSQLExecuteSql # from PostgreSQLExecuteSql import PostgreSQLExecuteSql # import sys ”’ TZQ 环境 汇总 一套执行 ”’ # 执行的脚本文件全路径 # 脚本目录名 DIR_STRING = “D:/oracle_database/sql/” # 脚本文件名 # FILE_NAME = “20220706-1736-tzq-xxxxx.sql” # FILE_NAME = “20220715-1522-张三-xxxx更新.sql” FILE_NAME = “20230822-2312-log创建表-log_test_t.sql” ”’ TZQ 环境 汇总 一套执行 ”’ # 脚本全路径 sql_file_path = DIR_STRING + FILE_NAME print(sql_file_path) # 定义类的实例 postgreSQLExecuteSql = PostgreSQLExecuteSql.PostgreSQLExecuteSql() # ################################各个环境下执行脚本################################ # 在 “TZQ DEV 环境” 执行脚本 # postgreSQLExecuteSql.exec_sql__TZQLOG_DB_DEV(sql_file_path) # 在 “TZQ PRO 环境” 执行脚本 postgreSQLExecuteSql.exec_sql__TZQLOG_DB_PRO(sql_file_path)
- 20230822-2312-log创建表-log_test_t.sql 在 D:/oracle_database/sql/ 目录下创建脚本文件:20230822-2312-log创建表-log_test_t.sql: create table log_info_t ( info_id INT8 not null, info_type_id INT8, title VARCHAR(200), content TEXT, article_view_count INT8 default 1 not null, created_by INT8 default -1 not null, creation_date TIMESTAMP(0) default CURRENT_TIMESTAMP not null, last_updated_by INT8 default -1 not null, last_update_date TIMESTAMP(0) default CURRENT_TIMESTAMP not null, delete_flag VARCHAR(1) default ‘N’ not null, deleted_by INT8, delete_date TIMESTAMP(0), content_no_html TEXT, info_right VARCHAR(50) default ‘all’ ); CREATE SEQUENCE log_info_s; 如下图: 脚本内容是创建表和序列。下面我们来执行下Python脚本,看能不能在我们的目标数据库中能够创建表和序列。
- 执行完后信息:
- 查看数据库中,已经有了这个表和序列 至此。Python执行PostgreSQL数据库的SQL脚本,就为大家演示完毕了!!! 以上就是Python执行PostgreSQL数据库的SQL脚本详解的详细内容,更多关于Python执行PostgreSQL数据库sql脚本的资料请关注风君子博客其它相关文章! 您可能感兴趣的文章: Python 操作 PostgreSQL 数据库示例【连接、增删改查等】 Python中用psycopg2模块操作PostgreSQL方法 Python使用psycopg2连接PostgreSQL数据库的步骤 Python连接到PostgreSQL数据库的方法详解 Python操作PostgreSQL数据库的基本方法(增删改查) Python模块psycopg2连接postgresql的实现 利用python为PostgreSQL的表自动添加分区
目录
- 使用psycopg2插件
- psycopg2插件使用
- 1、Python更新pip插件
- 2、Python安装psycopg2插件
- 3、信任该安装源
- 1.4、Python安装chardet插件
- 5、查看已安装的插件pip list
- 6、创建Python文件
- 7、创建Python文件
- 8、创建测试SQL脚本
- 9、执行execute_db_script.py
- 10、查看数据库
psycopg2插件简介
psycopg2库介绍: Psycopg2是一个用于Python编程语言的第三方库,用于访问PostgreSQL数据库系统。它提供了一组工具和方法,可以轻松地在Python程序中进行数据库操作,包括查询、插入、更新、删除等操作。
以下是Psycopg2库的一些主要特点:
1.简单易用:Psycopg2提供了简单的API,易于学习和使用。
2.高性能:Psycopg2是基于C语言实现的,能够提供高效的数据库操作。
3.完全兼容:Psycopg2与PostgreSQL数据库完全兼容,并支持大多数PostgreSQL特性。
4.安全性:Psycopg2具有内置的防止SQL注入攻击的功能,能够保证数据安全。
5.使用Psycopg2库进行数据库操作通常需要以下步骤:
- 安装psycopg2库:可以使用pip install psycopg2来安装该库。
- 建立数据库连接:使用psycopg2库提供的connect()方法建立与数据库的连接。
- 执行SQL语句:使用psycopg2提供的方法执行SQL语句,如查询、插入、更新等操作。
- 处理查询结果:如果执行的是查询操作,需要使用fetchone()或fetchall()方法来处理查询结果。
- 关闭连接:最后需要使用close()方法关闭数据库连接。
以管理员权限打开命令行窗口,执行下面的命令:
python -m pip install --upgrade pip -i https://pypi.tuna.tsinghua.edu.cn/simple

以管理员权限打开命令行窗口,执行下面的命令:
pip install psycopg2 -i https://pypi.tuna.tsinghua.edu.cn/simple

报错:ERROR: Cannot determine archive format of C:UserstttzzAppDataLocalTemppip-req-build-rrzp7n41
以管理员权限打开命令行窗口,执行下面的命令:
pip install -i https://pypi.tuna.tsinghua.edu.cn/simple --trusted-host pypi.tuna.tsinghua.edu.cn psycopg2

pip install -i https://pypi.tuna.tsinghua.edu.cn/simple --trusted-host pypi.tuna.tsinghua.edu.cn chardet
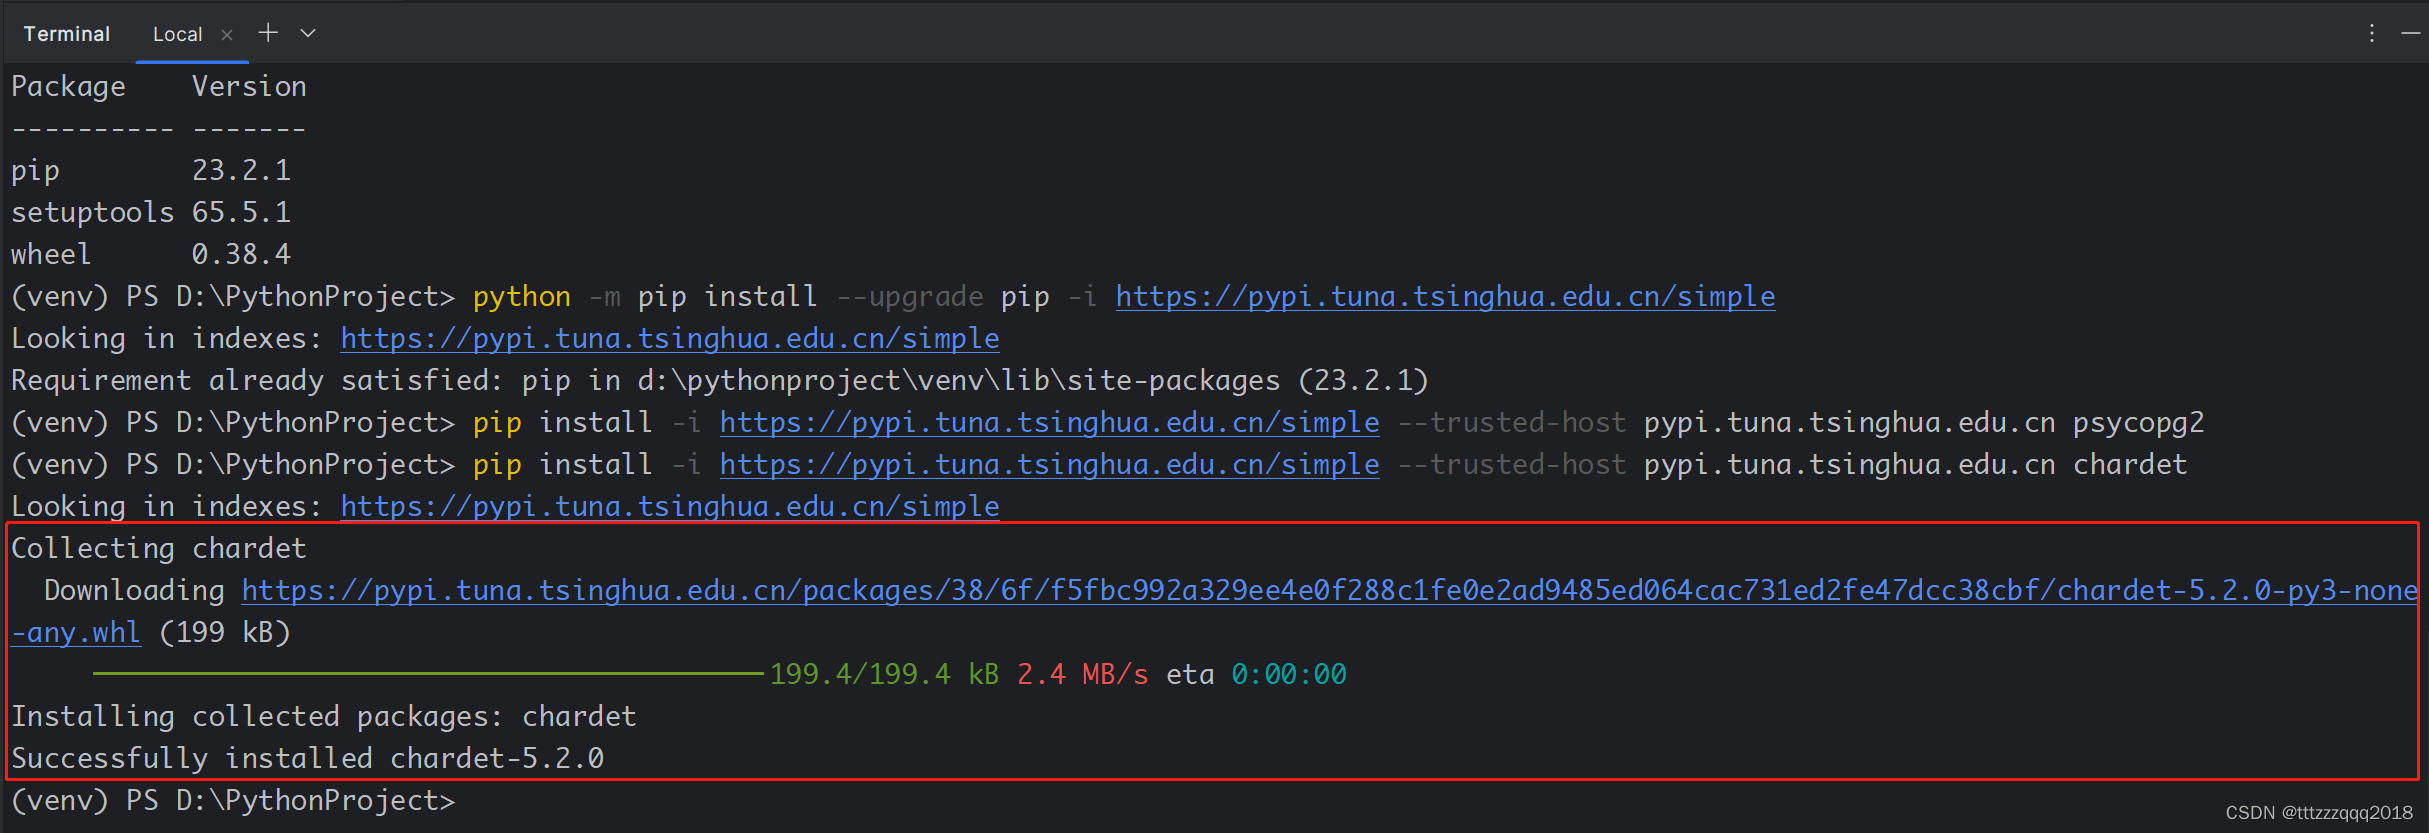
PyCharm下安装chardet插件,安装完毕。
pip list
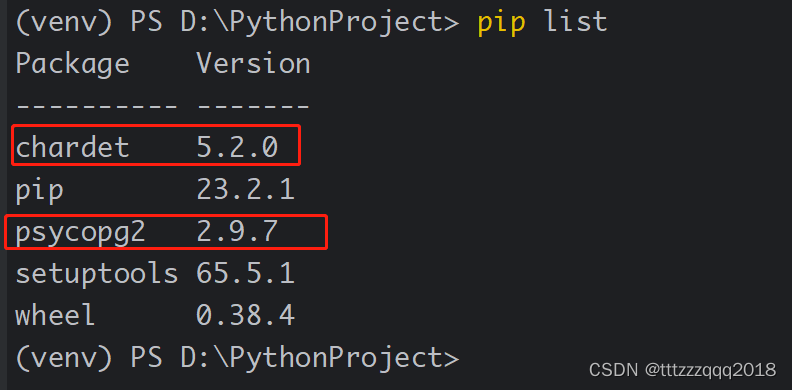
从上面的清单,发现插件chardet及psycopg2都安装成功了,下面开始来创建Python文件来对PostgreSQL数据库进行操作。
PostgreSQLExecuteSql.py
上代码:
#!/usr/bin/python
# -*- coding: UTF-8 -*-
import chardet
import psycopg2
import psycopg2.extras

class PostgreSQLExecuteSql:
    """
    Python Test Library for TZQ
    """

    def __init__(self):
        pass

    def get_encoding(self, file):
        # 获取文件编码类型
        # 二进制方式读取,获取字节数据,检测类型
        with open(file, 'rb') as f:
            return chardet.detect(f.read())['encoding']

    # 输出文件所有内容
    def get_file_content1(self, file_path):
        # filePath="d:/20220711-1657.sql"
        file_encoding = self.get_encoding(file_path)
        # print(get_encoding(filePath))
        file = open(file_path, "r", encoding=file_encoding)
        # print(file.read())
        str = file.read()
        file.close()
        return str

    # 按行输出文件内容
    def get_file_content2(self, filePath):
        # filePath="d:/20220711-1657.sql"
        file_encoding = self.get_encoding(filePath)
        print(self.get_encoding(filePath))
        file = open(filePath, "r", encoding=file_encoding)
        # print(file.readline())
        str = file.readline()
        file.close()
        return str

    # for循环读取文件内容
    def get_file_content3(self, filePath):
        with open(filePath, "r", encoding=self.get_encoding(filePath)) as file:
            for item in file:
                print("file_content:" + item)

    # conn = psycopg2.connect("dbname=tzqlog_pro user=tzq password=Tzq@123456 host=127.0.0.1 port=5432")
    # 连接数据库执行脚本
    def conn_db_exec_sql(self, sql_script, dbname, user, password, host, port):
        connect_string = "dbname=" + dbname + " user=" + user + " password=" + password + " host=" + host + " port=" + port
        print(connect_string)
        # 连接到数据库
        conn = psycopg2.connect(connect_string)
        # 建立游标,用来执行数据库操作
        # 这⾥创建的是⼀个字典Cursor, 这样返回的数据, 都是字典的形式, ⽅便使⽤
        # cursor = conn.cursor()
        cursor = conn.cursor(cursor_factory=psycopg2.extras.DictCursor)
        # 读取文本文件中的内容
        file_content = self.get_file_content1(sql_script)
        # 执行SQL命令
        cursor.execute(file_content)
        # 提交SQL命令
        conn.commit()
        # 执行SQL SELECT命令
        # command = 'SELECT * FROM test_conn '
        # cursor.execute(command)
        ## 获取SELECT返回的元组
        # rows = cursor.fetchall()
        # 关闭数据库连接
        conn.close()
        # print(rows)

    """TZQLOG"""
    # 连接数据库执行脚本 - TZQLOG PRO 环境
    def exec_sql__TZQLOG_DB_PRO(self, sql_script):
        # 配置项
        dbname = "tzqlog_db_pro"
        user = "plan"
        password = "Tzq@123456"
        host = "127.0.0.1"
        port = "5432"
        self.conn_db_exec_sql(sql_script, dbname, user, password, host, port)

# if __name__ == '__main__':
#     postgreSQLExecuteSql = PostgreSQLExecuteSql()
#     # 执行的脚本文件全路径
#     sql_file_path = "D:/20220706-1736-tzqlog_XXX.sql"
#     # 在 TZQLOG PRO 执行脚本
#     postgreSQLExecuteSql.exec_sql__TZQLOG_DB_PRO(sql_file_path)
execute_db_script.py
上代码:
#!/usr/bin/python
# -*- coding: UTF-8 -*-
import PostgreSQLExecuteSql
# from PostgreSQLExecuteSql import PostgreSQLExecuteSql
# import sys

''' TZQ 环境 汇总 一套执行 '''

# 执行的脚本文件全路径
# 脚本目录名
DIR_STRING = "D:/oracle_database/sql/"
# 脚本文件名
# FILE_NAME = "20220706-1736-tzq-xxxxx.sql"
# FILE_NAME = "20220715-1522-张三-xxxx更新.sql"
FILE_NAME = "20230822-2312-log创建表-log_test_t.sql"

''' TZQ 环境 汇总 一套执行 '''
# 脚本全路径
sql_file_path = DIR_STRING + FILE_NAME
print(sql_file_path)
# 定义类的实例
postgreSQLExecuteSql = PostgreSQLExecuteSql.PostgreSQLExecuteSql()

# ################################各个环境下执行脚本################################

# 在 “TZQ DEV 环境” 执行脚本
# postgreSQLExecuteSql.exec_sql__TZQLOG_DB_DEV(sql_file_path)

# 在 “TZQ PRO 环境” 执行脚本
postgreSQLExecuteSql.exec_sql__TZQLOG_DB_PRO(sql_file_path)
20230822-2312-log创建表-log_test_t.sql
在 D:/oracle_database/sql/ 目录下创建脚本文件:20230822-2312-log创建表-log_test_t.sql:
create table log_info_t
(
  info_id            INT8 not null,
  info_type_id       INT8,
  title              VARCHAR(200),
  content            TEXT,
  article_view_count INT8 default 1 not null,
  created_by         INT8 default -1 not null,
  creation_date      TIMESTAMP(0) default CURRENT_TIMESTAMP not null,
  last_updated_by    INT8 default -1 not null,
  last_update_date   TIMESTAMP(0) default CURRENT_TIMESTAMP not null,
  delete_flag        VARCHAR(1) default 'N' not null,
  deleted_by         INT8,
  delete_date        TIMESTAMP(0),
  content_no_html    TEXT,
  info_right         VARCHAR(50) default 'all'
);
CREATE SEQUENCE log_info_s;
如下图:
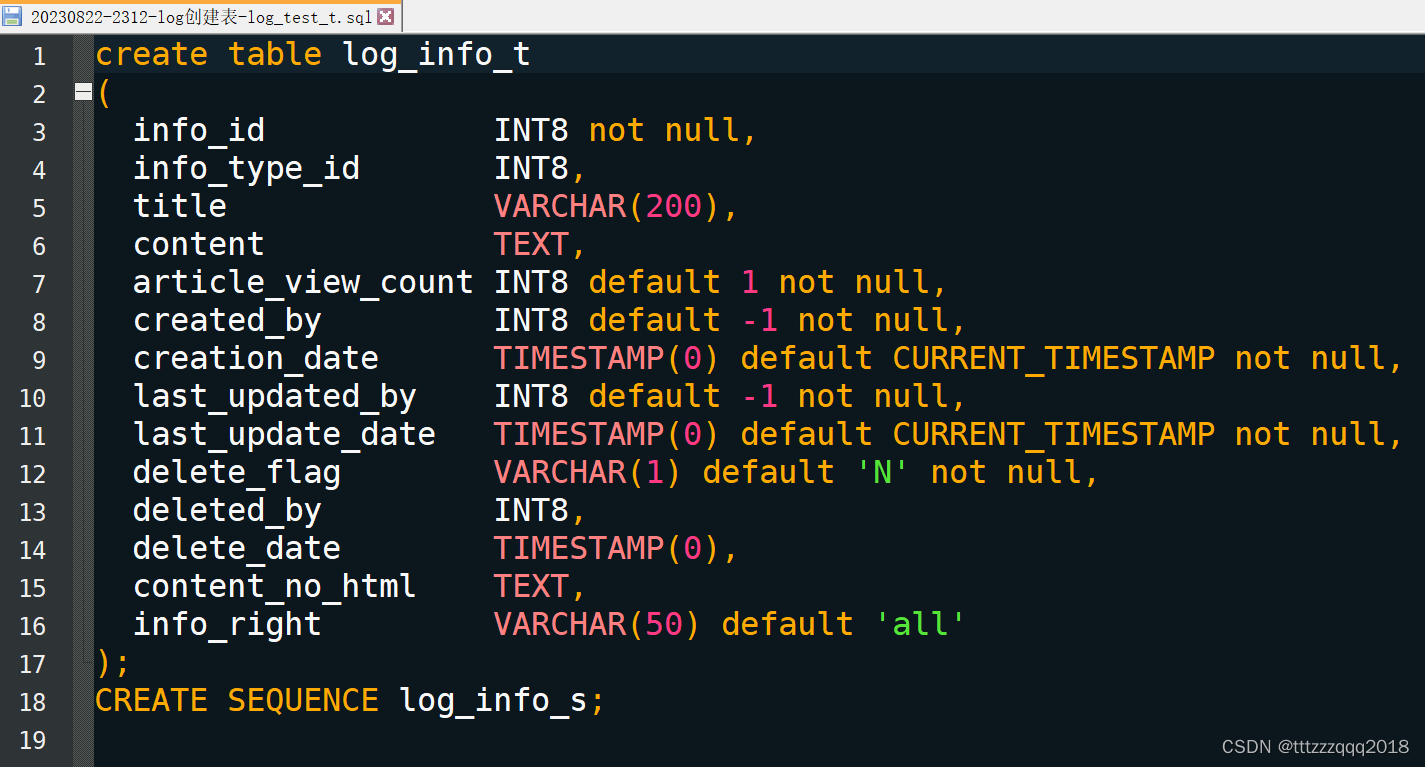
脚本内容是创建表和序列。下面我们来执行下Python脚本,看能不能在我们的目标数据库中能够创建表和序列。
执行完后信息:
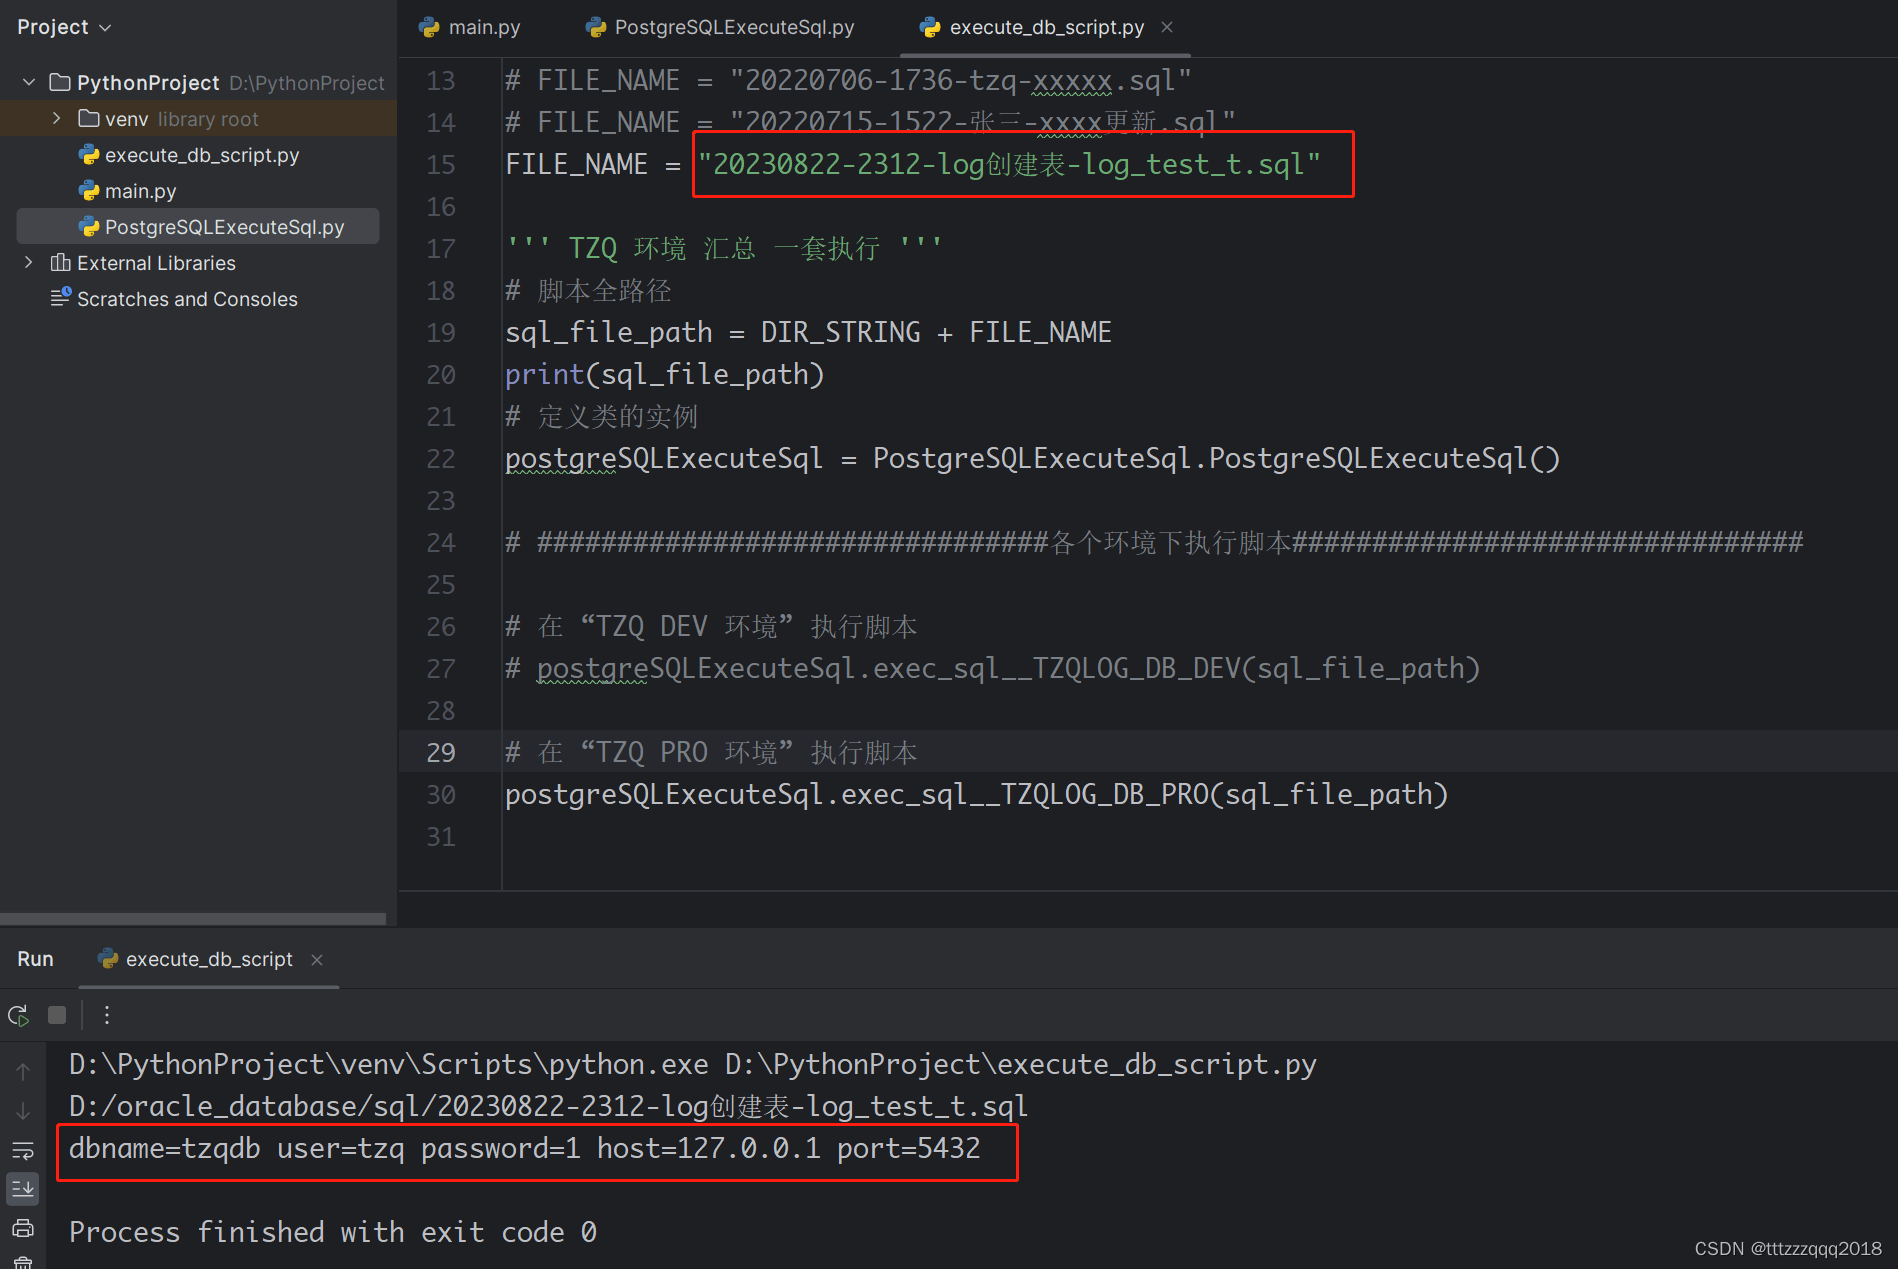
查看数据库中,已经有了这个表和序列
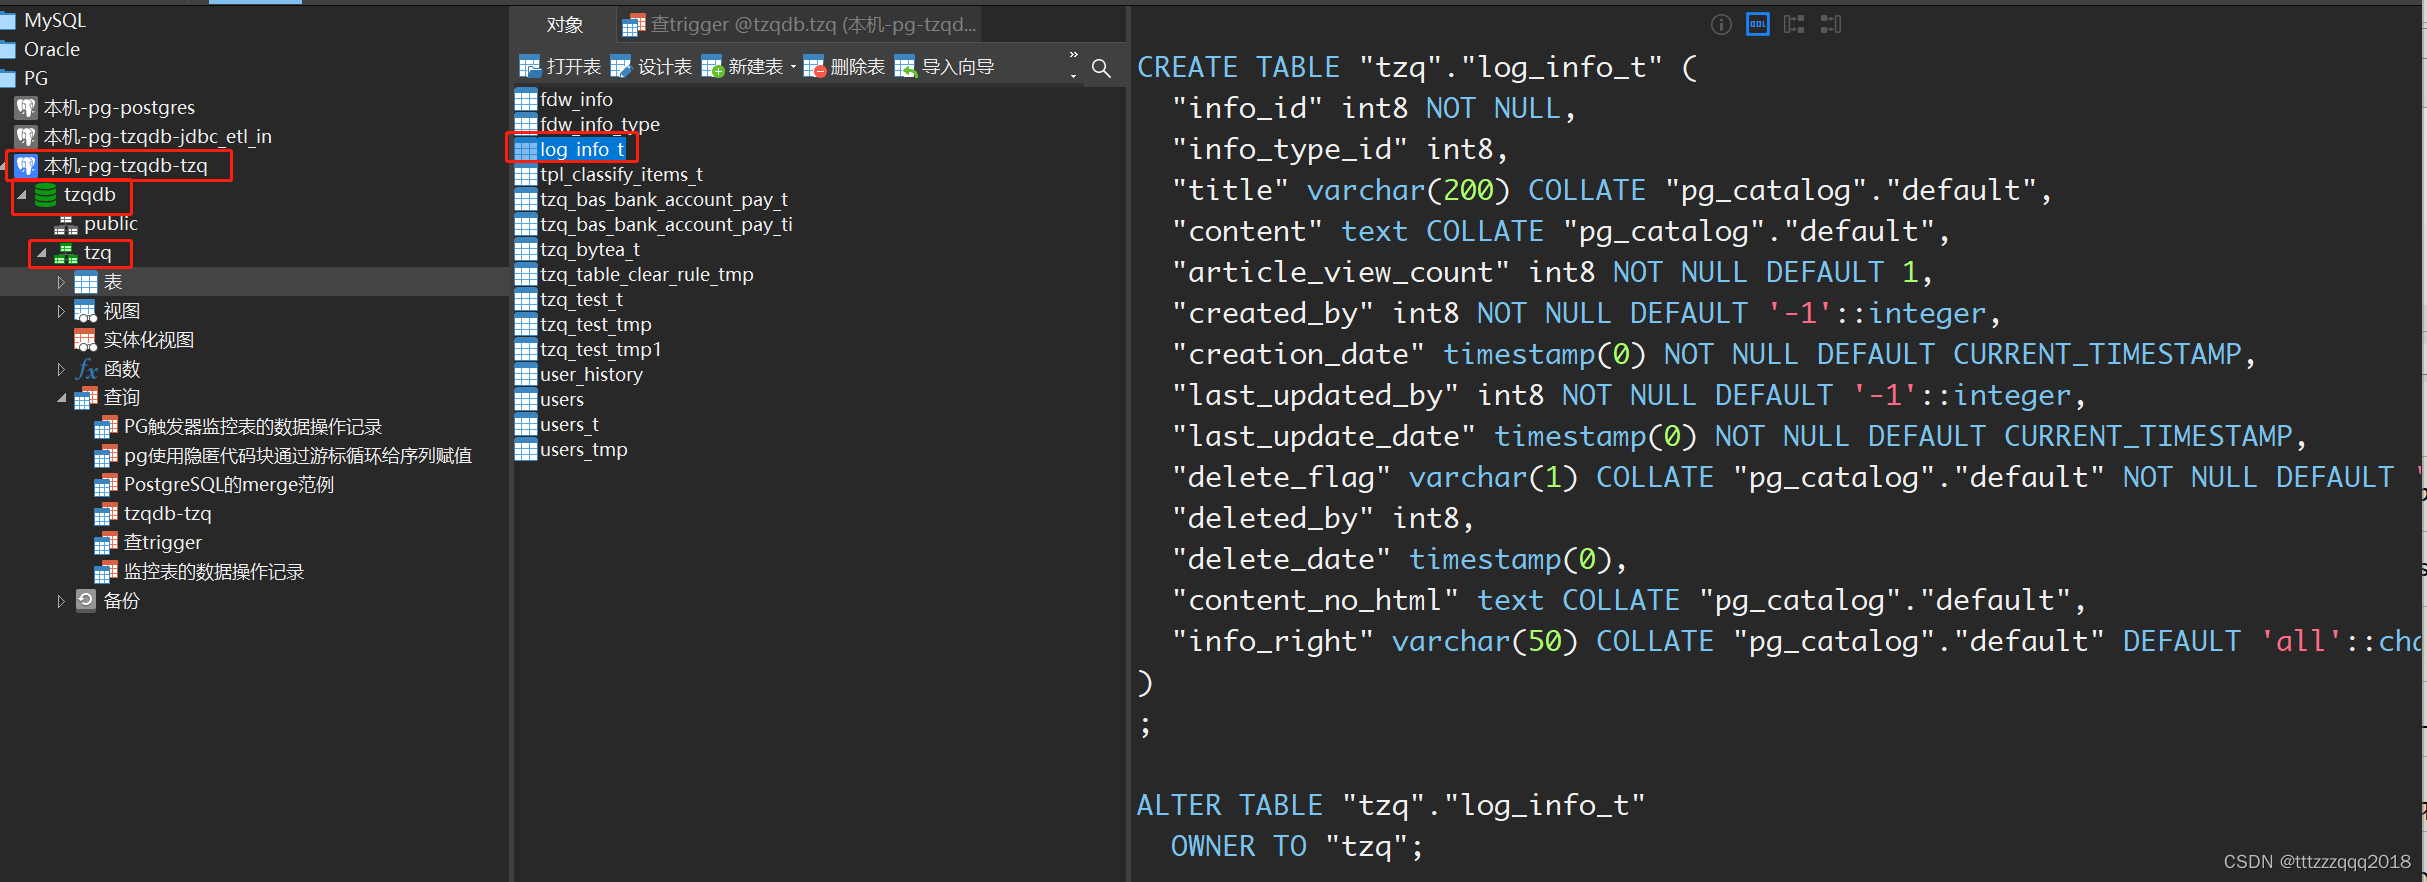
至此。Python执行PostgreSQL数据库的SQL脚本,就为大家演示完毕了!!!
以上就是Python执行PostgreSQL数据库的SQL脚本详解的详细内容,更多关于Python执行PostgreSQL数据库sql脚本的资料请关注风君子博客其它相关文章!
您可能感兴趣的文章:
- Python 操作 PostgreSQL 数据库示例【连接、增删改查等】
- Python中用psycopg2模块操作PostgreSQL方法
- Python使用psycopg2连接PostgreSQL数据库的步骤
- Python连接到PostgreSQL数据库的方法详解
- Python操作PostgreSQL数据库的基本方法(增删改查)
- Python模块psycopg2连接postgresql的实现
- 利用python为PostgreSQL的表自动添加分区